Friday, February 19, 2010

Final Location & Blessed with Beer

For the final destination I chose the backyard along the side I usually put my garden. It has an ivy covered fence for a background.


After the winter rains the grass has grown up a bit.


I also decided to give it a beer bath to encourage moss growth.


Just so no beers lovers are too alarmed. Note that the beer is two years + past it's best by date.


Tuesday, November 10, 2009

The Statue - A Work In Progress

The Statue

It all started with the film "Spirited Away". I really liked that film and much of its imagery. I like the glimpses of Japanese culture as well.

There was one statue in the film that I really thought was interesting, and a fore shadowing of a theme in the film.


In the movie the statue is shown to have a face on both sides. In this case, the faces seems to be the same. I backed and paused the DVD several times checking this.

I had thought to buy some Studio Ghibli toy that of that statue - ideally a potted plant watering device. The kind where you stick it in the soil, fill it with water, and it waters slowly over time. But I was unable to find one.

Then some one suggested, "Hey, you're an artist, why do not you make your own?"

So I pondered. Do I do a six inch soapstone?
Do I try a SuperSculpie / Fimo sculpture? How big?

Then I read about Hypertufa.
Tufa is a light weight rough stone that is easily carved and was popular for troughs and planters in England.
Hypertufa is a man made substitute. It is made from a mix of Portland Cement, Vermiculite, and Peat moss. The recipes vary but after some reading I was leaning towards 1:1:1 ratio.

Usually when I start a new material, like carving soapstone or such, I start with something small to get a handle on the material before I set out to do what I had in mind in the first place.

Not this time. I may have been a little too ambitious. I decided to build it about 3 foot tall.

What follows is the work in progress.

Monday, November 9, 2009

First things... well, whenever.

Having thought I might make my own statue with Hypertufa, I read about working with Hypertufa online.

Rule 1: Safety. Wear gloves, goggles, respirator, and long sleeves when working with Portland Cement.

Rule 2: You can work it when it is wet, or one day dry - more then that and it is like carving stone.

There is rule 3 but I didn't pick it up till much further into the process.

Having decided to make a statue, I first made sketches of the one in the film from the DVD.


I then debated how to build the interior support structure. Most of what I had seen online was how to build planters. That was basically, find a bowl, pot, or bucket; cover it with plastic so you can get it to release; and then cover it with Hypertufa.

I knew it needed to be hollow; just for the weight issue if not for the cost. But how to do that ...

I set off to the hardware stores, the garden stores, and do-it-yourself centers. Just looking for ideas. I found a great pot that was almost right but was close to $200 just for it. G'ah. Keep looking and thinking. Hyla suggested paper mache, and I thought that might work for some of it. But it would still something about the right size for an under support.

Sunday, November 8, 2009

For the World is Hollow ...

After considering a variety of options for and having it sit in the back of my mind for a while; I decided to just leap in feet first. I bought the Portland Cement, peat moss, and vermiculite, some gloves, dust masks, towel, and mixing bin.

I decided to use a large plastic planter, and a 5 gallon bucket for basic form. But I needed a domed top ... paper mache! I was about ready to build the under structure.


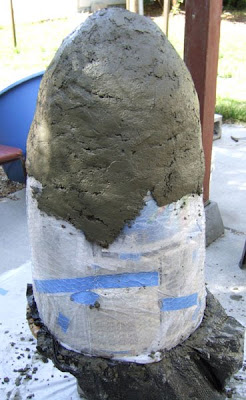
I decided to build it on top of a circular board I had. I also put those on some cinder blocks to raise it off the ground a bit. A little painter's tape and mover's wrap ...


It almost looks like a Dalek.
But it needs more filling out. It is too tall and narrow. So I start adding newspaper to fill it out more.


I wrap all the newspaper in plastic so that it will hopefully release easier from the finished sculpture. I add a casing of chicken wire for the Hypertufa to stick to. In hind sight, I probably should have used hardware cloth, which is a wire mesh with a smaller screen size.

Saturday, November 7, 2009

The Messy Part.

There is an old saying; if it is fun, it is messy.

I mixed up a batch of Hypertufa trying to stay close to 1 part cement, 1 part moss, 1 part vermiculite. I was measuring by volume though not weight. Cement is fine and packs, the others ... not so much. But I was getting a "mud Pie" consistency.

I started at the top. I don't know why.


Then I made a band down to the base and worked around the base... adding an outline for where I felt the face should be.


Then filled the rest of the open space.


I began to rough out more of the face.


I let it dry for a bit while considering whether or not I was happy with it.


I was not very happy with the results so far.

Friday, November 6, 2009

Intent vs. Results

I tried to figure out why I was not happy with it.

It is a case of being too close to the object. I was working away with out stepping back enough. When I did step back and look at the original intent I realized I had diverged significantly from the original. That was why I was unhappy with the results. One lesson I was trying to keep in mind was: don’t let fear of failure keep you from trying.

This was my first try at a large sculpture and my first try at this material. It would be pretty amazing if everything went as planned. The question I faced now was: can I get something I like from what I have?

I thought about it for a while and decided that I had too much invested in terms of time, material, and money to just chuck it and start over. I was also too far along to make that significant an adjustment to the structure to bring it back in line with what I had originally wanted. Could I reach a point with what I had that I would happy with?

I think I can. I decided that since I was no longer trying for an exact reproduction I could make some other changes as well. The statue pictured in the movie has two faces, one opposite each other. But they have the essentially the same expression. I paused and backed up the DVD several times to make sure. I could do the more traditional two faces where they sort opposite expressions. The two halves in each of us.

Also, I had become convinced that it might just break up when I tried to remove the under structure.

This is when I found rule #3.

I was re-reading some of the online Hypertufa material and came across this advice.
If you want to build something large and heavy like a trough. You should build it in place where you want it to be.

D'oh. Oh, well. Too late now.

Trying to get the face was going to be tricky. I was trying to figure out a way to get a mouth that I would like. I finally built a cardboard cut out, covered that with plastic, and used it as a hand held form and support while shaping the mouth.


I also roughed out the second face.

Thursday, November 5, 2009

Trying to Get It Together

I did a bit more work on the second face and arms. I added some more material to waist and began filling in areas that had gaps or seemed too irregular in material.


Normally our dog Otsu sits outside with me while I work. She protects me from the squirrels. Today Monmon came out to check on the progress.


I feel like the sculpture is about 85% done now. I will do some subtractive work with a scraper next. I have tried that already in some areas and it works pretty good for getting a better final shape to things like mouth edges, eyes, and such. I also want to add a final cement 'wash' over it to unify the look a bit more. Then let it sit for a few weeks before trying to move it to its final site, and remove the under structure.

Hypertufa is still a pretty crude material and not suited for fine detail. My sources say that as it weathers, the moss will degrade and make the surface a bit rougher as well.

Since I hope to get some moss to grow on it, the advise is to wash it with a vinegar water mix to counter the acidity of the cement. Other moss encouraging suggestions are a beer wash (preferably a dark beer), or you can blend moss and beer together to make a moss encouraging slurry. Mmmm.... slurry.